

Here is a brief explanation of SSH keys and why they are used
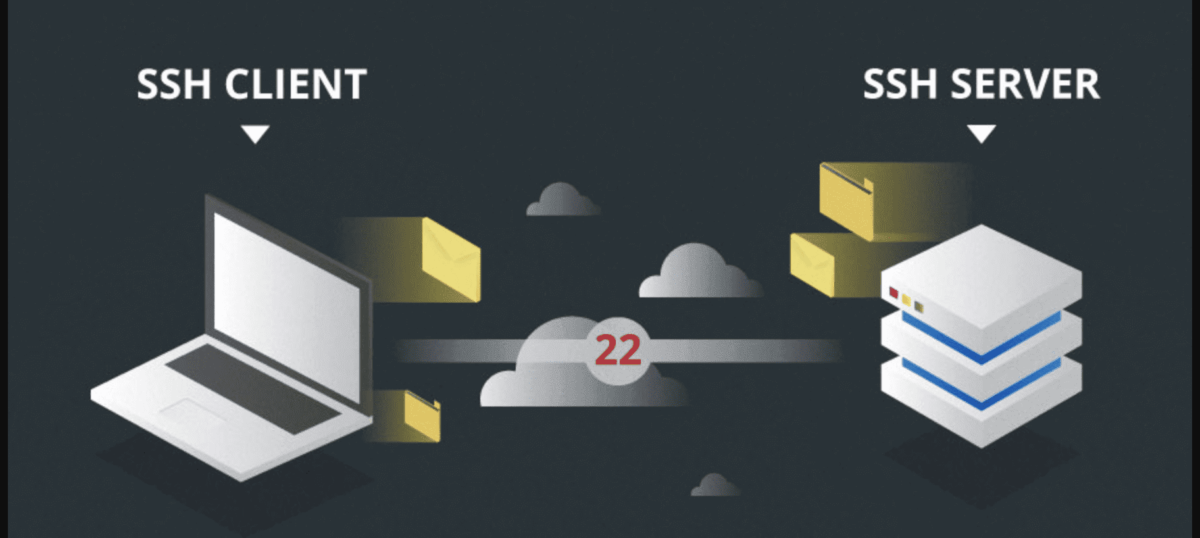
Let us start by clarifying what SSH is. SSH, short forSecure Shell, a security protocol that encrypts data in transit between your computer and the server, as shown in the diagram below.
To connect to a server, you would normally use the root password over SSH. But is that genuinely secure? From a systems engineer's point of view, using the root password for SSH still carries real risk. Once your VPS is online it becomes an easy target for attack, particularly password guessing by attackers. So how do you protect your server more effectively? Let's look at how to useSSH Key– a more effective security solution.
SSH Keyis an authentication method that uses a security key pair consisting ofPrivate KeyandPublic Key. You can think of it simply as:Public Keyis the lock, whilePrivate Keyis the key. The two keys are closely linked, ensuring that only someone holding the “key” can “unlock” access. When you generate an SSH key, you receive two files:
- Public Key: Stored on a server or VPS.
- Private Key: Stored on your own computer and held only by you.
This combination eliminates the risk of password-guessing attacks, because only those who havePrivate Keycan sign in. Even if it is accidentally exposedPrivate Key, you still have an additional layer of security calledPassphrase– a passphrase to protect the private key.
Given these benefits, using an SSH key is not just advisable but an essential step in strengthening the security of your server. Let’s create an SSH key and set up a secure connection.
How to create an SSH key
Many tools can generate an SSH key, but they all do essentially the same thing: create a key pair consisting ofPublic KeyandPrivate Key. In this section we will show how to create an SSH key onWindowsandLinux.
1. Using PuTTY on Windows
Install the support tool:
- Download and installPuTTYgen
Using PuTTYgen:
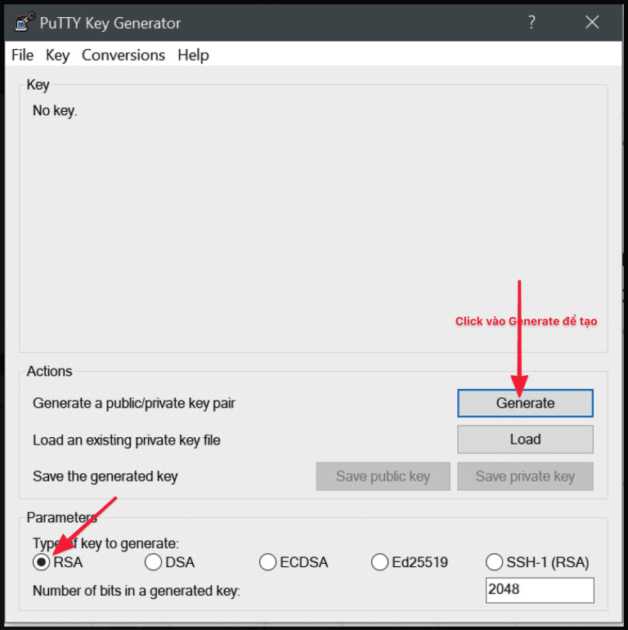
Once downloaded and installed, open PuTTYgen to create the SSH key. Here you selectGenerateto create.
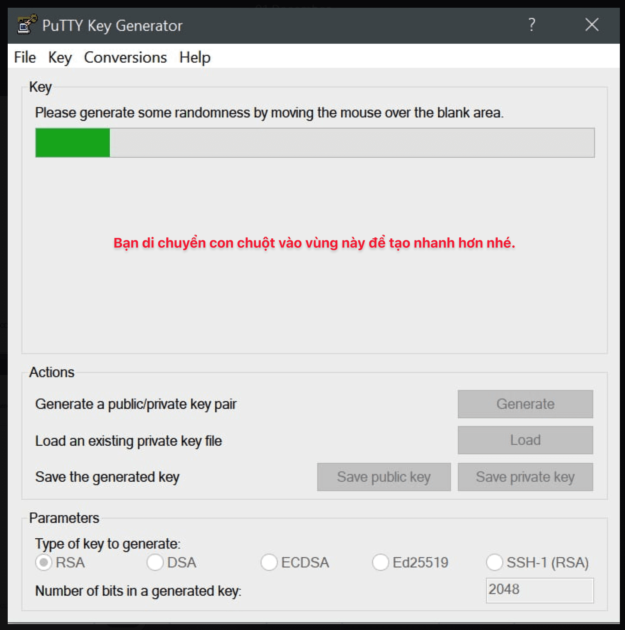
Next,Move the mouse into this empty boxuntil the SSH key is created.
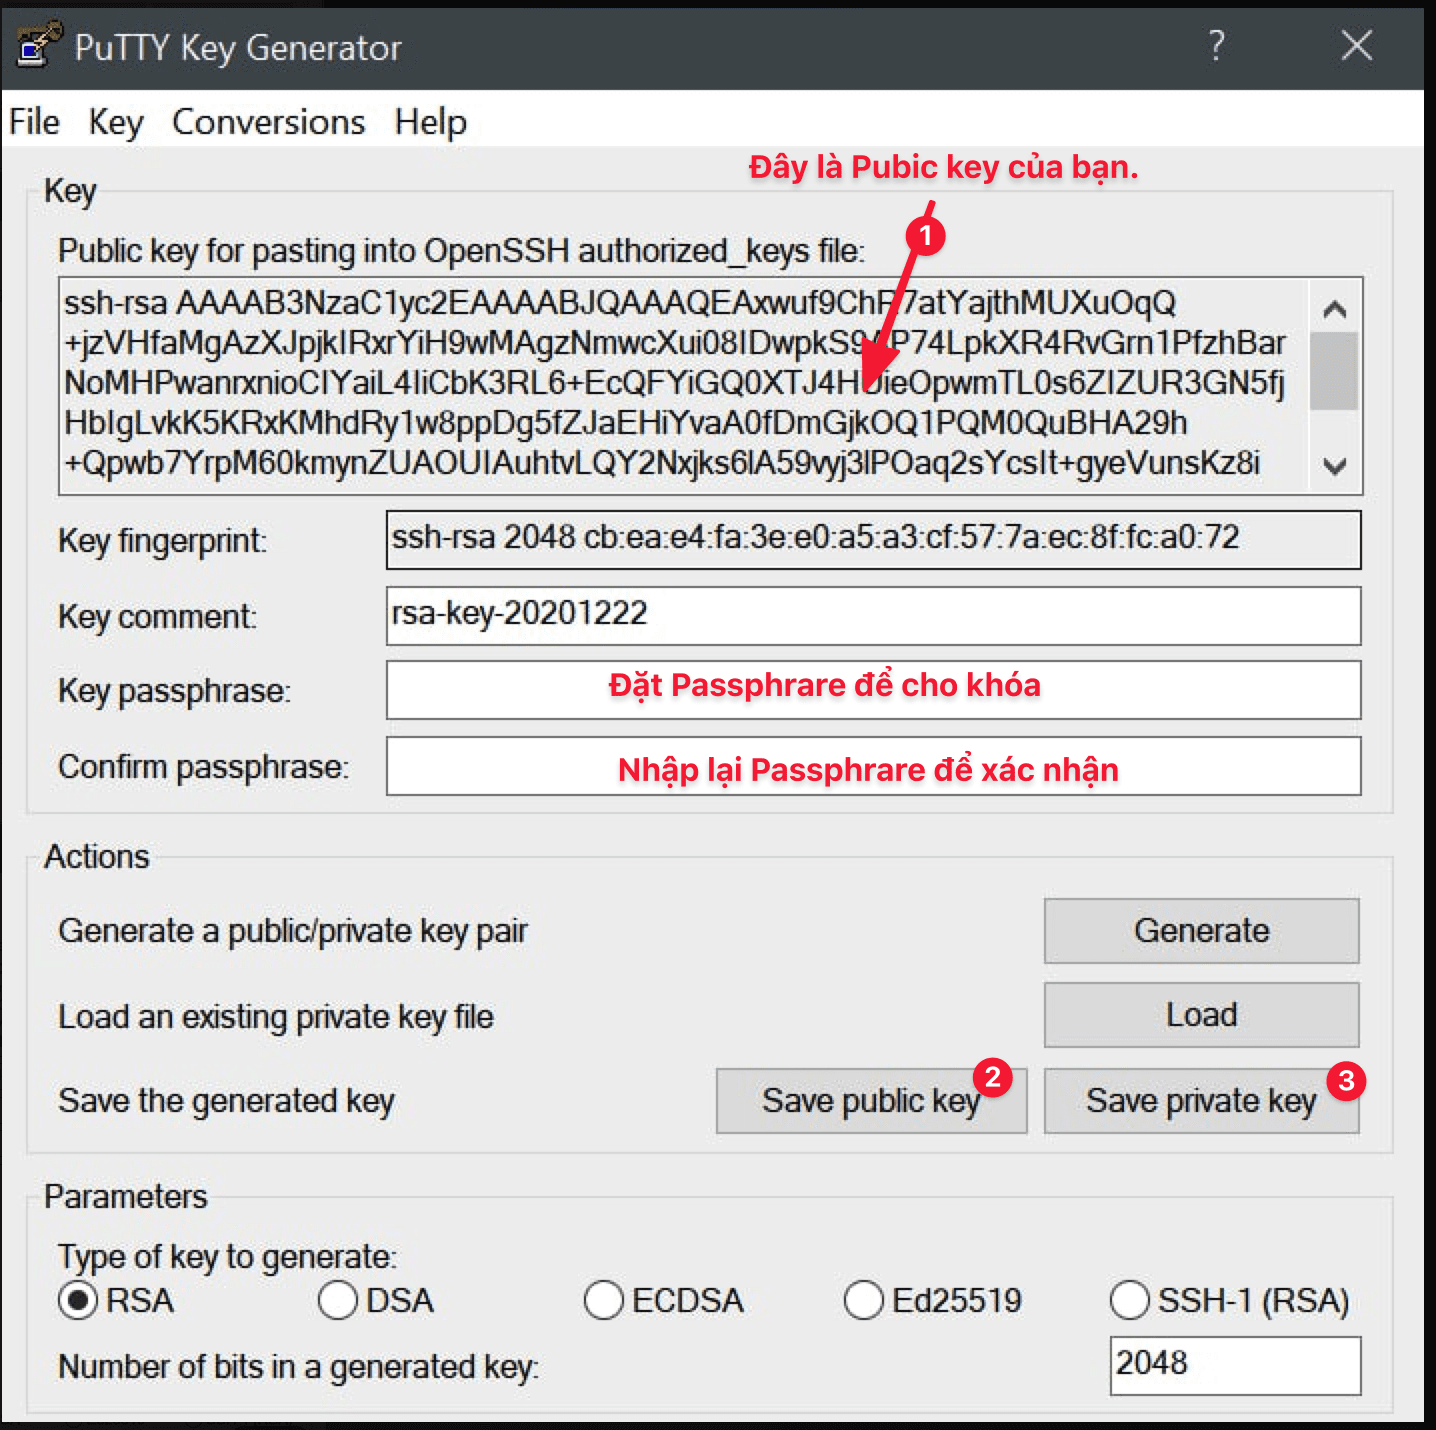
When you see the screen below, it has worked. But there is one more step: setpassphraseto open the private key. Enter a password of your choice in the fieldKey passphaseandConfirm passphase. Once you have finished entering it, clickSave private keyandsave public keyto save it on a personal machine.
2. Using Windows Terminal to create an SSH key
OpenWindows TerminalorCommand Prompt. Run the command:
ssh-keygen -t rsa -b 4096 -C "your_email@example.com"Save the key pair to the default folder (~/.ssh/) or choose a different location as you prefer.
Public Keylocated in the file.pubandPrivate Keyis the remaining file.
3. Using Linux/macOS
ForLinuxorMacOS, both of which are Unix-based operating systems, so the procedure and the commands for generating an SSH key are nearly identical. To create aPublic KeyandPrivate Key, you just need to follow the steps below:
Step 1: Open the windowTerminal.
Step 2: Run the following command
ssh-keygen -t rsaStep 3: Follow the on-screen instructions:
- Confirm where the key will be saved (the default is
~/.ssh/id_rsa) or specify a different path if you prefer. - SetPassphraseto add protection to the private key (optional, but recommended).
Step 4: Get the SSH key
Once complete, you will receive:
- Public Key: usually located in the file
~/.ssh/id_rsa.pub. - Private Key: usually located in the file
~/.ssh/id_rsa.
Guide to using an SSH key
Once you have created the SSH key in the steps above, follow the steps below to start using it.
Step 1: UploadPublic Keyto the server/VPS
First, log in to the server or VPS with root credentials (password). Then run the following commands in order:
mkdir ~/.ssh
chmod 700 ~/.ssh
touch ~/.ssh/authorized_keys
chmod 600 ~/.ssh/authorized_keys
Run the command below to copy the entire public key string you generated
nano ~/.ssh/authorized_keys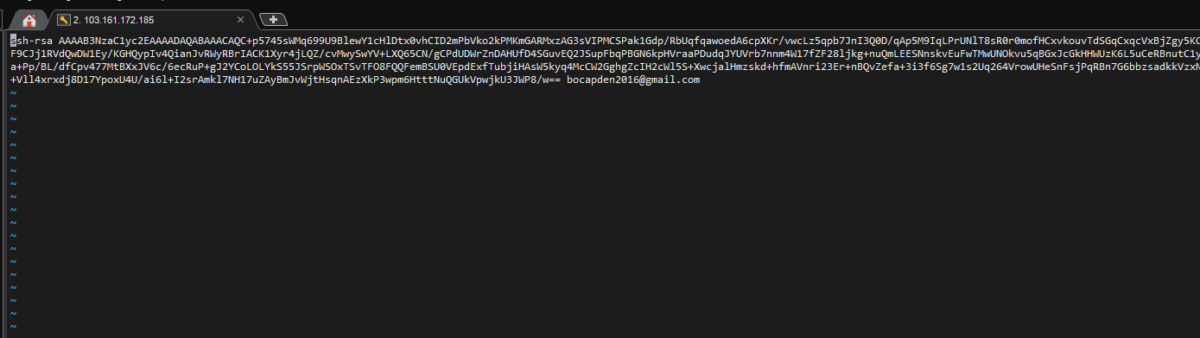
Step 2: Configure SSH
Once you have configured your SSH key successfully, you should disable password login (PasswordAuthentication) to prevent password-guessing and brute-force attacks. The steps are as follows:
1. Open the SSH configuration file:
Use your preferred text editor to open the file/etc/ssh/sshd_config. For example, usenano:
sudo nano /etc/ssh/sshd_config2. Find the PasswordAuthentication configuration line:
Find the line:
PasswordAuthentication yes3. Change the state to “no”:
PasswordAuthentication no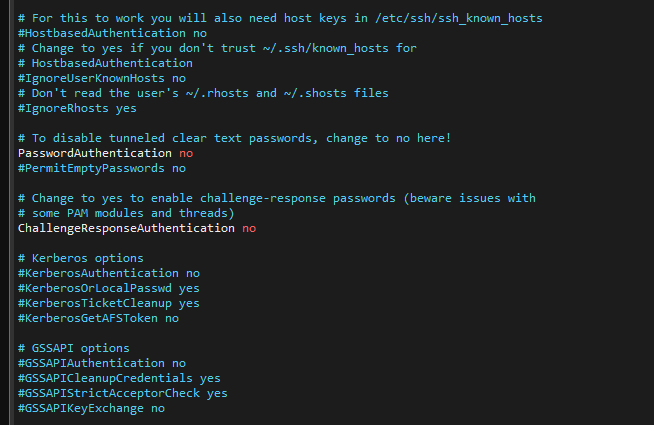
4. Save the file and exit:
Withnano, clickCtrl + Oto save, then pressCtrl + Xto exit.
5. Restart the SSH service:
Apply the change by restarting the SSH service:
sudo systemctl restart sshdStep 3:Using an SSH key
Using an SSH key onWindowsandLinuxthere are some differences. Below is a detailed guide to using an SSH key onWindowswith PuTTY.
Using an SSH key with PuTTY on Windows
- Open PuTTY:
- Launch PuTTY, the common SSH client on Windows.
- Configure use of a Private Key:
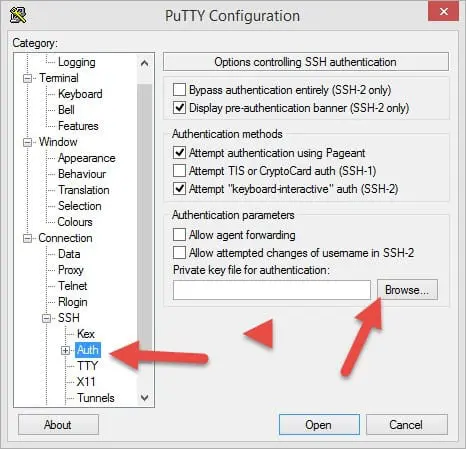
- In the PuTTY window, navigate toConnection > SSH > Authin the left-hand menu.
- Click the buttonBrowseand select the filePrivate Keycreated and saved in the previous step (the file with the extension
.ppk).
- Connect to the server:
- Back to sectionSession, enter the server's IP address into theHost Name (or IP address)and clickOpento start the connection.
- Enter the passphrase:
- If your private key is protected by a passphrase, PuTTY will prompt for it during connection. Enter the correct passphrase to complete the login.
Using an SSH key with Linux/macOS
OnLinuxorMacOS, using an SSH key to connect is very simple. You just need to openTerminaland follow the instructions below:
- Use the SSH command to connect:
Enter the following command in the Terminal:ssh -i /path/to/private_key username@server_ip/path/to/private_key: The full path to the private key file you created (usually in~/.ssh/id_rsa).username: The username used to log in to the server (for example:rootor another username).server_ip: The server's IP address or domain name.
- Enter the passphrase (if any):
If your private key is protected by a passphrase, the system will prompt for it. Enter the passphrase to continue connecting. - Verify the connection succeeded:
Once the details are correct, you will connect to the server without entering a password.
Example:
Suppose you store your private key at~/.ssh/id_rsa, the username isroot, and the server's IP address is192.168.1.100. The command is as follows:
ssh -i ~/.ssh/id_rsa root@192.168.1.100Note:
- If your private key file is in the default directory (
~/.ssh/id_rsa), you can skip the option-iand simply run:bashCopy codessh username@server_ipSSH will automatically use the key in the default directory. - Make sure the private key file has safe permissions (readable only by you):bashCopy code
chmod 600 ~/.ssh/id_rsa
With the steps above, you can now use an SSH key to log in to your server securely on Linux or macOS.